Integrating Rehance With Your Site
Add Rehance to your site and bring it all together.
In the integration step, your site will be connected to Rehance. This will expose a text-based interface that your users can call up to interact with your web application. Rehance will process the user's input and the context that you provide into a set of actions that your user is attempting to perform.
There are two integration approaches:
-
Drop-in Script: This is the easiest way to get started. You simply add a script tag to your site and write some Javascript to ensure the appropriate data is passed, and Rehance will display the interface and handle the rest.
-
Custom Integration: This approach is more flexible, but requires more work. You will need to build your own text interface, and then use the Rehance API to send users' inputs and context to be converted into actions.
Drop-in Script
The easiest way to integrate Rehance into your site is to use our drop-in script. Just add the following script tag to your site:
<script src="https://rehance.ai/resources/drop-in-script/YOUR_PUBLIC_KEY.js" />
You can find your public key on the Integration page.
The above script will not immediately render the Rehance widget. Instead, it will expose a global
Rehance object. To render the widget, there are three steps. Let's assume you want Rehance to
allow users to rename their documents. Here's how you'd set that up:
First, set up callbacks for your app's actions, matching the configuration in the Actions page:
Rehance.setActions({
  'rename-document': async (parameters) => {
    // This assumes you have defined "id" and "name" as parameters of the "rename-document" action
    const { id, name } = parameters;

    // Rename the document here
  },
  ...
});
Then, supply the context, matching the configuration in the Context page. Each field should contain an array of objects, where each object has the fields specified in the context item's configuration.
Rehance.setUserContext({
  user: [
    {
      name: 'John Doe',
      email: 'John@example.com',
    },
  ],
  documents: [
    {
      id: 1,
      name: 'Document 1',
    },
    {
      id: 2,
      name: 'Document 2',
    },
  ],
});
Finally, render the widget:
Rehance.show();
When you need to hide the widget entirely, you can do so with the hide function:
Rehance.hide();
You can update the actions and context at any time by calling the above functions again.
Custom Integration
If you'd rather build your own UI, you can use our API directly. The endpoint is
https://rehance.ai/api, and you should use it to make a request on behalf of the user.
The request must include a publicKey query parameter with your application public key. It should look like this:
https://rehance.ai/api?publicKey=YOUR_PUBLIC_KEY
You can find your public key on the Integration page. The request must be a POST request with a JSON body. The body must be of the following shape:
{
  "prompt": "The prompt entered by the user in plain text",
  "context": {
    "context-item-name": [
      {
        "field1": someValue,
        "field2": someOtherValue,
        ...
      },
      ...
    ],
    ...
  }
}
The response will be a JSON object with the following shape:
{
  "actions": [
    {
      "action": "the id of the action to execute",
      "parameters": {
        "parameter-name-1": "someValue",
        ...
      }
    },
    ...
  ],
  "requestId": "The ID of the request that was processed."
}
If the actions field of the response body is an empty array, then Rehance was unable to find any
actions to recommend. In the case of errors, an error field will be present in the response body,
with the error message.
UI
When building the UI, we recommend including an approval step where the user can see the proposed actions (and their public-facing parameters) and approve them before they are executed. This will help prevent accidental actions. You can also integrate Rehance's actions into the undo/redo stack of your application to ensure that they can be easily reverted.
Here is the style of interface you may want to build:
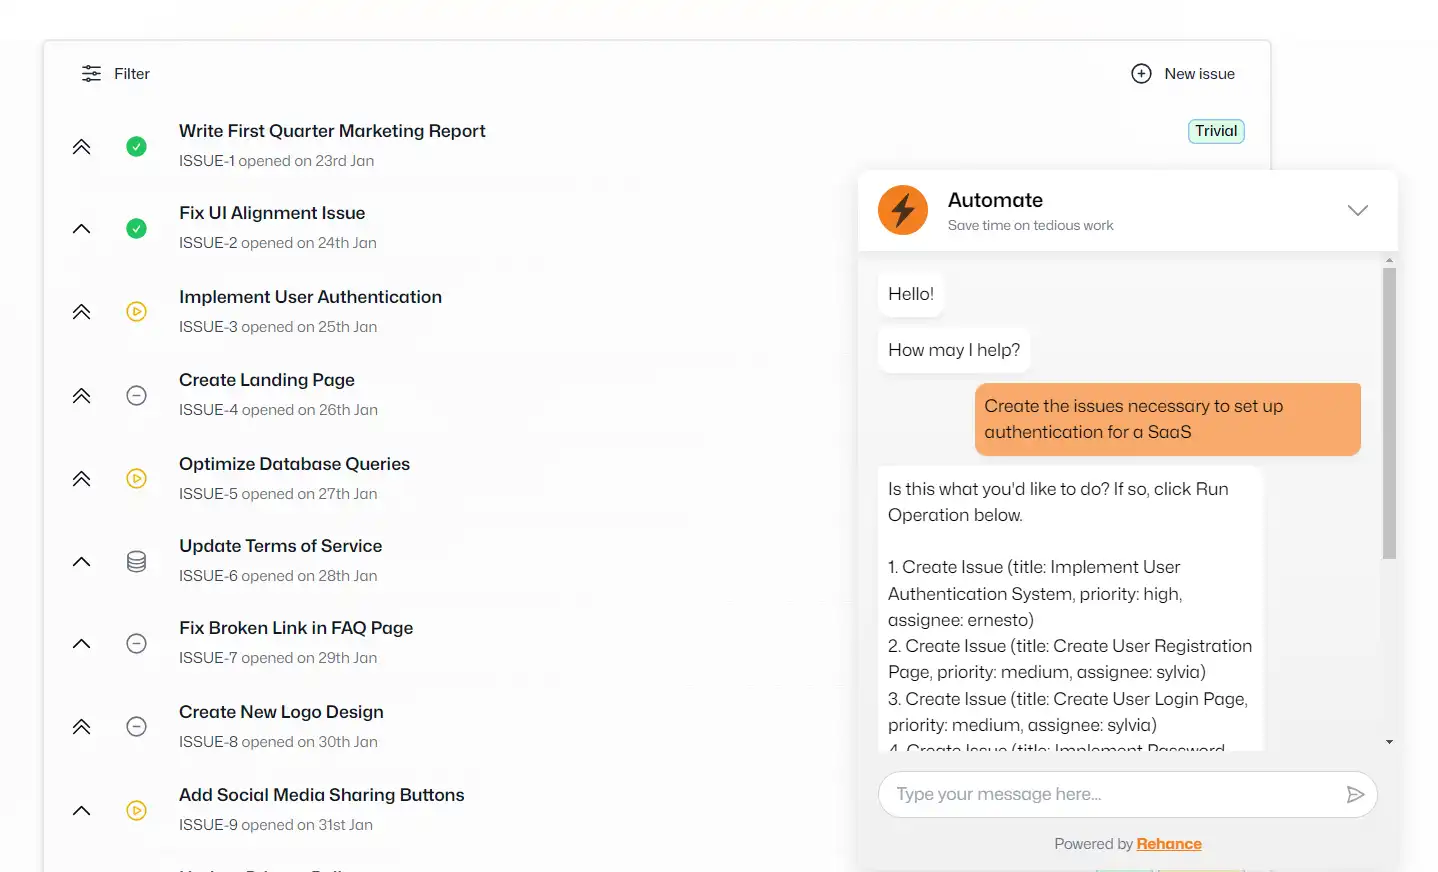
The above UI is what Rehance provides if you use the drop-in script.
Limitations
Rehance can currently handle requests up to 10kb in size. We plan to increase this number, but it should be plenty for most use cases. Make sure to pass only the required context to Rehance, without any unnecessary data, to avoid breaching this limit.